Let’s Encrypt quicker start
In spite of the popularity of Let’s Encrypt for generating free SSL/TLS certificates, I think their getting started page stinks. In case you feel the same way, I’ll try to give you a real quick start that will get you to your first certificate.
Certificate Authority
Let me point out that anyone with Linux (or Docker for that matter) can create a strong SSL/TLS certificate and encrypt their data. No third party is necessary. Where third parties like Comodo, GeoTrust, Verisign and now Let’s Encrypt come in is as Certificate Authorities. Publishers of web browser software (and many other types of software and operating systems), bundle a collection of Certificate Authority (CA) certificates with their software. Certificates signed by any CA in the bundle are accepted as legitimate, while certificates signed in any other way are treated as suspect and usually result in a warning to the user at the time the connection is made.
Domain Validation
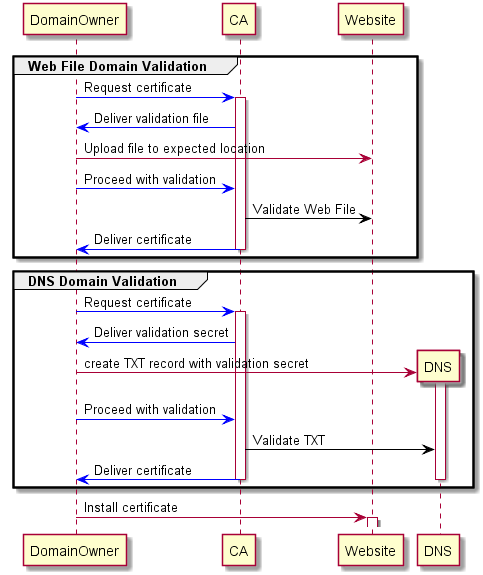
The reason certificates issued by a CA are considered legitimate is that the CA is expected to do some type of validation that the person requesting the certificate has a relevant association with the domain being encrypted. Over time this has divided into two categories, Enhanced Validation or Domain Validation. Enhanced Validation involves some level of human work to confirm that a company exists, is legal, is established in some geographical area, etc. Most websites today use Domain Validation, which just confirms that the person requesting the certificate actually has control over the domain. Two common ways to do this include modifying DNS and uploading a file to a website. This is illustrated below.

In each case, the domain owner requests an SSL/TLS certificate from the CA. The CA then delivers a validation value that it generated. The domain owner then uploads the file or updates DNS with the validation secret and tells the CA to complete validation. The CA attempts to access the web file or query DNS for the TXT value it provided. If the CA finds the file or TXT value, it accepts that as confirmation of domain control and generates the certificate.
The above diagram is common to all CAs, not just Let’s Encrypt.
Interacting with the CA
In the case of Let’s Encrypt as the CA, the domain owner communicates using the ACME protocol. There are lots of ACME clients that implement this protocol. I’m going to focus on acme.sh, which is written in bash and publishes a Docker image for ease of use.
Using acme.sh in Docker
The docker command below runs the acme.sh script and stores everything written to the container directory /acme.sh/ in the local directory /local/path/to/acme.sh/. I think it’s a little confusing that they gave the directory the same name as the script file, but the -v argument below refers to a directory somewhere on your local host and in the container named acme.sh.
docker run -it --rm -v "/local/path/to/acme.sh:/acme.sh" neilpang/acme.sh
That command above will output a help message with options that can be passed in to perform specific actions. Here’s a command that’s a little more interseting.
$ docker run -it --rm --entrypoint /bin/sh neilpang/acme.sh
/ # acme.sh --issue -d watrous.ws --dns --yes-I-know-dns-manual-mode-enough-go-ahead-please
[Tue Apr 10 13:52:05 UTC 2018] Registering account
[Tue Apr 10 13:52:06 UTC 2018] Registered
[Tue Apr 10 13:52:06 UTC 2018] ACCOUNT_THUMBPRINT='XLMGl5PKBRV2T5R3D16NVcsHHiIPNDUSUhHhQxeeLUE'
[Tue Apr 10 13:52:06 UTC 2018] Creating domain key
[Tue Apr 10 13:52:06 UTC 2018] The domain key is here: /acme.sh/watrous.ws/watrous.ws.key
[Tue Apr 10 13:52:06 UTC 2018] Single domain='watrous.ws'
[Tue Apr 10 13:52:06 UTC 2018] Getting domain auth token for each domain
[Tue Apr 10 13:52:06 UTC 2018] Getting webroot for domain='watrous.ws'
[Tue Apr 10 13:52:06 UTC 2018] Getting new-authz for domain='watrous.ws'
[Tue Apr 10 13:52:06 UTC 2018] The new-authz request is ok.
[Tue Apr 10 13:52:06 UTC 2018] Add the following TXT record:
[Tue Apr 10 13:52:06 UTC 2018] Domain: '_acme-challenge.watrous.ws'
[Tue Apr 10 13:52:06 UTC 2018] TXT value: '3hMeU7QN6DEMqPBK4fkGQSHcoZeTFV_47XSW9-hG1j8'
[Tue Apr 10 13:52:06 UTC 2018] Please be aware that you prepend _acme-challenge. before your domain
[Tue Apr 10 13:52:06 UTC 2018] so the resulting subdomain will be: _acme-challenge.watrous.ws
[Tue Apr 10 13:52:06 UTC 2018] Please add the TXT records to the domains, and re-run with --renew.
[Tue Apr 10 13:52:06 UTC 2018] Please add '--debug' or '--log' to check more details.
[Tue Apr 10 13:52:06 UTC 2018] See: https://github.com/Neilpang/acme.sh/wiki/How-to-debug-acme.sh
A few things to notice in the above output. First is that it mentions registering an account. This is an account on Let’s Encrypt that will be associated with any certificates generated. Details about that new account are stored in the acme.sh folder. Notice that it also created a new private key. It then provides a sub domain and a TXT value. You must use this to update your DNS so that it has a record of the exact sub domain and the exact TXT record under that domain.
A Note about Docker and Windows
The natural approach on Linux/Mac would be to use -v /local/path/to/acmefiles:/acme.sh so that the account, private key and other details from the ACME interaction are available after the container exists. Unfortunately, Windows volumes mounted into Docker use SMB and don’t accommodate Linux file system features, like ownership and permissions. This causes acme.sh (and certbot and various other ACME clients) to fail. That’s why in the example above I run the command in a shell in the container rather than using volumes and capturing the data outside the container.
After updating or creating the DNS TXT record, the --renew command can be run, as explained in the previous output. Here’s the output from that command.
/ # acme.sh --renew -d watrous.ws --yes-I-know-dns-manual-mode-enough-go-ahead-please
[Tue Apr 10 14:01:57 UTC 2018] Renew: 'watrous.ws'
[Tue Apr 10 14:01:58 UTC 2018] Single domain='watrous.ws'
[Tue Apr 10 14:01:58 UTC 2018] Getting domain auth token for each domain
[Tue Apr 10 14:01:58 UTC 2018] Verifying:watrous.ws
[Tue Apr 10 14:02:01 UTC 2018] Success
[Tue Apr 10 14:02:01 UTC 2018] Verify finished, start to sign.
[Tue Apr 10 14:02:02 UTC 2018] Cert success.
-----BEGIN CERTIFICATE-----
MIIGADCCBOigAwIBAgISA9apVONYgxqnnoMX1PHdZmdVMA0GCSqGSIb3DQEBCwUA
[TRUNCATED]
JyoMi23Ucwi/eiIw4M5n4VUmqYe5o2DpNa3B4/B4GsQiuzu3fdlweYfhre7Y6fJu
wLH16A==
-----END CERTIFICATE-----
[Tue Apr 10 14:02:02 UTC 2018] Your cert is in  /acme.sh/watrous.ws/watrous.ws.cer
[Tue Apr 10 14:02:02 UTC 2018] Your cert key is in  /acme.sh/watrous.ws/watrous.ws.key
[Tue Apr 10 14:02:02 UTC 2018] The intermediate CA cert is in  /acme.sh/watrous.ws/ca.cer
[Tue Apr 10 14:02:02 UTC 2018] And the full chain certs is there:  /acme.sh/watrous.ws/fullchain.cer
[Tue Apr 10 14:02:02 UTC 2018] It seems that you are using dns manual mode. please take care: The dns manual mode can not renew automatically, you must issue it again manually. You'd better use the other modes instead.
[Tue Apr 10 14:02:02 UTC 2018] Call hook error.
Paths to the resulting certificate, key and full authority chain are included in the output. These can then be added to your application for full, trusted SSL protection.
Automating
Automation occurs at two different points.
- Automate the creation of the SSL certificate
- Automate the installation of the SSL certificate
In this article I have only discussed the first point, and I have given a manual demonstration. In order to automate this process, the acme.sh client (or certbot or any other client) needs access to update DNS or publish a file hosted on the domain (see the red lines in the sequence diagram above). The acme.sh script supports 45 different DNS providers, including cloud providers like AWS Route 53 and Azure and free options like FreeDNS.
For the second point, the acme.sh script can automate the installation of the new certificate for Apache and Nginx. Clients like certbot can automate installation of the certificate in HAProxy, plesk, etc.